 Wednesday and Thursday I spent a couple of really fun hours with my neighbor’s daughter (age 50) and her granddaughters (age 14 and 10). They had wanted to do an art project while they were here, so I set them all up in the dining room with trays,a sheet of watercolor paper, squirt bottles of water and acrylic ink. We also had some fun shapes and washi paper that would resist the paint and make interesting designs. See their finished works below.

This technique, with a few slight changes, I learned from Terry Balady at The Atelier in Chatsworth, CA. Next time I do something like this, I will take pictures along the way. It will make it easier to understand and I won’t have to use so many words.
Here’s how it worked:
DAY 1:
We all used the same three colors of diluted acrylic ink: red, blue and yellow; and all had access to the same materials. But, you guessed it, we created completely different works of art. Here’s the process:
1. Spray the paper to get it wet.
2. Drop ink one color at a time onto the paper in different places. Just a few drops so the paint runs and leaves a lot of light spaces.
3. Spray the paper again if the paint isn’t moving. You want the colors to run into each other so that you end up with red, blue, yellow, purple, green and orange.
4. Let it sit for a few minutes while you select some shapes to put onto the paper. We used embroidery supports – those round things with holes all around in a circle, bottle and jar lids, yogurt cups and torn up wrapping paper. We also glued on strips of paper bags and different textures of washi papers.
5. Once you have the shapes you like, put them down on the slightly damp paper and then squirt a little more ink around them. The shapes will push the ink away and make some really interesting designs. You can glue on some shapes and just place others if you think you might want to remove them the next day.
HINT: Dilute the glue or acrylic matte medium with half water. Mix up on old pieces of cardboard which you can throw away later. Use an old stiff paintbrush to apply the glue onto the support (the thing we just ironed). Just put enough glue on so the paper sticks. Then paint a light coat of the glue mixture over the paper. Get out all the bubbles.
Here’s the hard part: You need to leave it alone overnight so that it dries completely. If you don’t the paint will get muddy.
DAY 2:
1 Check to see if the painting is dry, and then remove everything that isn’t glued on.
2. Iron the painting on the back, using medium temp iron. Be sure to put facedown onto a thin cotton dish towel so that paint doesn’t come off onto your ironing board cover.
3. HINT: If the painting is still very wet in places, you can use a hairdryer on it. But beware that it will blow off any pieces that aren’t glued on.
4. Once the painting is fairly flat, and completely dry, you’re ready to put more collage pieces on.
5. Take a look at your painting from all angles. See if you think it has a direction. If not, just keep gluing on papers. You can stain the papers with ink and dry them, or you can paint a little diluted ink onto the papers. Don’t be afraid to cover up things. The washi paper designs and shapes show through and makes it interesting.
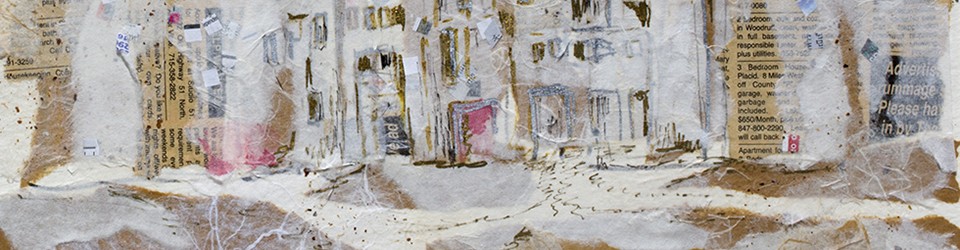
6. Use lots of paper in different shapes and sizes, put down in different directions. In the picture above you can see that I didn’t think too much about where I put the papers. I was just interested in them being different sizes and shapes. What emerged, at least when the painting is in this direction, is a woman walking. I can see her, maybe you can too?
7. Once you have glued on a lot of pieces of paper (like 20 or 30 on a 12″ x 15″ support) and you’ve added all a few more drops of ink, call it a day.
8. Let it dry for a day or two and then turn it around a few times and see what shows up.
9. Ask friends and family to tell you what they see in your painting. If you want to define it more, then get out the paintbrush and paint around what you see to make it more obvious. Add more collage pieces or more paint. I have one piece that has 10 different collages underneath it. I just kept gessoing over it until I did something I liked.
You can’t get a good result with this process unless you PLAY and MOVE around and just throw things down on the paper. What happened with our group was that the 50-year old had a wonderful experience of letting go and playing. Once she got into it, she didn’t want to stop. The other two, being kids, got it right away. After they all left yesterday, I dried their pieces with a hair dryer and ironed them on the back to straighten them out and then matted them. Last night I took them over to my neighbor’s house and we played “Stump the Grammy” to see if Grammy could tell who did which painting. She got it 100%. Here are their awesome pieces!!


Ok, now go PAINT and PLAY!!
Love,
Susie
Wow Susie, this is great and I’m going to try your technique…it looks like so much fun! I have a question about washi paper…what is it and where do I get it? Art supply store?
Thanks for the step by step tutorial!
Great looking art. Great use of colors!